Blog#25 : More on Select and Update Query for SLA/TAT calculation for Logistics Management.

Towards the end of last year, i hooked up with a friend for a casual talk and to wish him good luck for the new year, he was handling the logistics operation of an equipment manufacturer. During the course of discussion, he mentioned that he was using access as a tool to track all his consignments or say logistics details of all the equipment’s that are being shipped to customers from their respective depots/warehouses and that they had a contract with all the transporters on the SLA (TAT) Service Level agreement on time required for delivery from one City to another City. He had to track and report the time taken for delivery from one City to another city, which would help him track slip up/inefficiencies by the transporter on the delivery of the equipment’s.

In this example i would be guiding as to how to use access for determining the agreed and the actual SLA for every shipment that has been moved from depots of various city.

As usual, we require a “Master Table” to capture the agreed SLA (Agreed time of deliveries between cities) between the manufacturer and the transporter and a “Transaction Table” that captures the actual transaction details such as pick up date, Pick up City, Destination City etc (For the ease of purpose i am considering only transport by Road).

The master table is named as “SLA_TAT_Master” and the transaction table as “Shipment_Data“. Both tables are to be normalized as much as possible.

Both the tables are related to each using the PIN code column in both the table. The data Type of the PIN code column is to be set as Short Text, by default access would define them as Short number.

The agreed SLA between two cities for all shipment data or for a given criteria can be viewed using a select Query.

The data has been imported from MS Excel in MS Access using one of the methods mentioned in the previous posts.

Follow the process to create the select Query to view the agreed SLA without updating the Shipment_Data table (Transaction Table).

  • Open MS access.
  • Import the data (Both Tables) if not present. (No Need to import if you are using MS access to track the details).
  • Ensure the data type is same that will be used for the columns to set the relationship between the two tables.
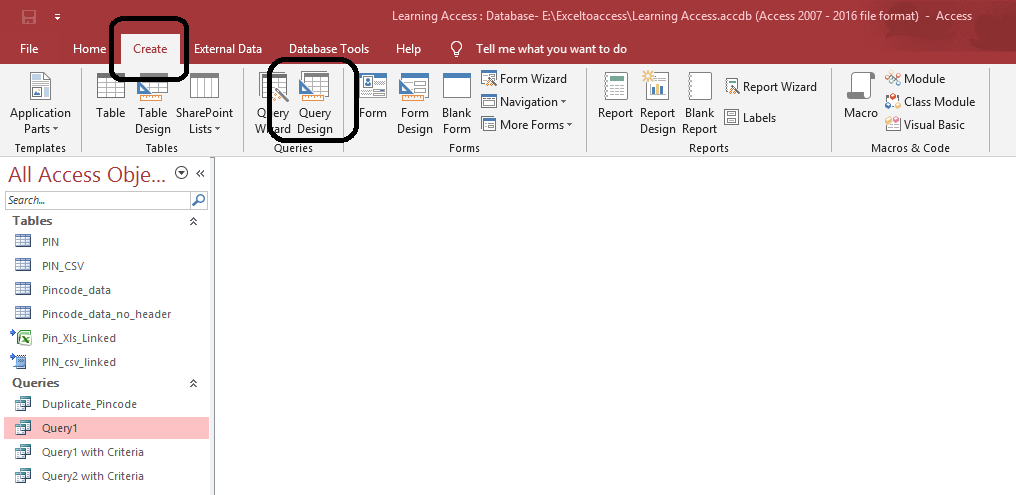
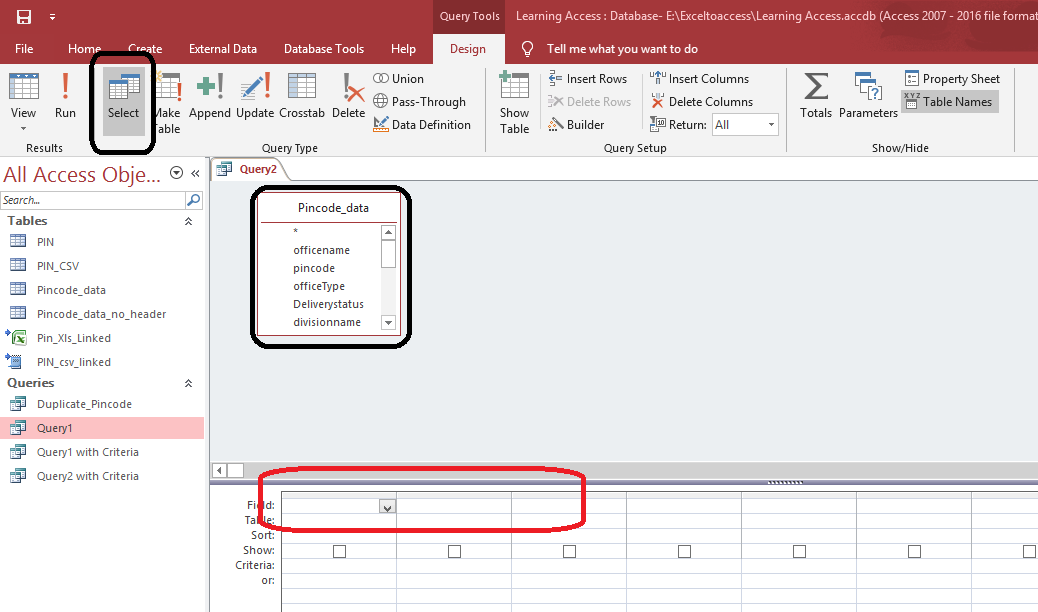
  • Create a new Query using the “Query Design” option and select the “Select” Mode.
  • Set relation between the two tables on the columns “Pickup_PIN” and “Destination_PIN” columns of both the tables.
  • Select the required columns (of your Choice) from the shipment Data Table, select the “SLA_TAT” from the master table at the end to get the agreed SLA.
  • Save the Query with the name “View_SLA_Query“.
  • Run the Query “View_SLA_Query” to view the results.

Follow the Process to create a query to update the SLA from the master table in the Shipment_Data Table against each Shipment or record, which is not updated previously.

  • Open MS access.
  • Import the data (Both Tables) if not present. (No Need to import if you are using MS access to track the details).
  • Ensure the data type is same that will be used for the columns to set the relationship between the two tables.
  • Create a new Query using the “Query Design” option and select the “Select” Mode
  • Set relation between the two tables on the columns “Pickup_PIN” and “Destination_PIN” columns of both the tables.
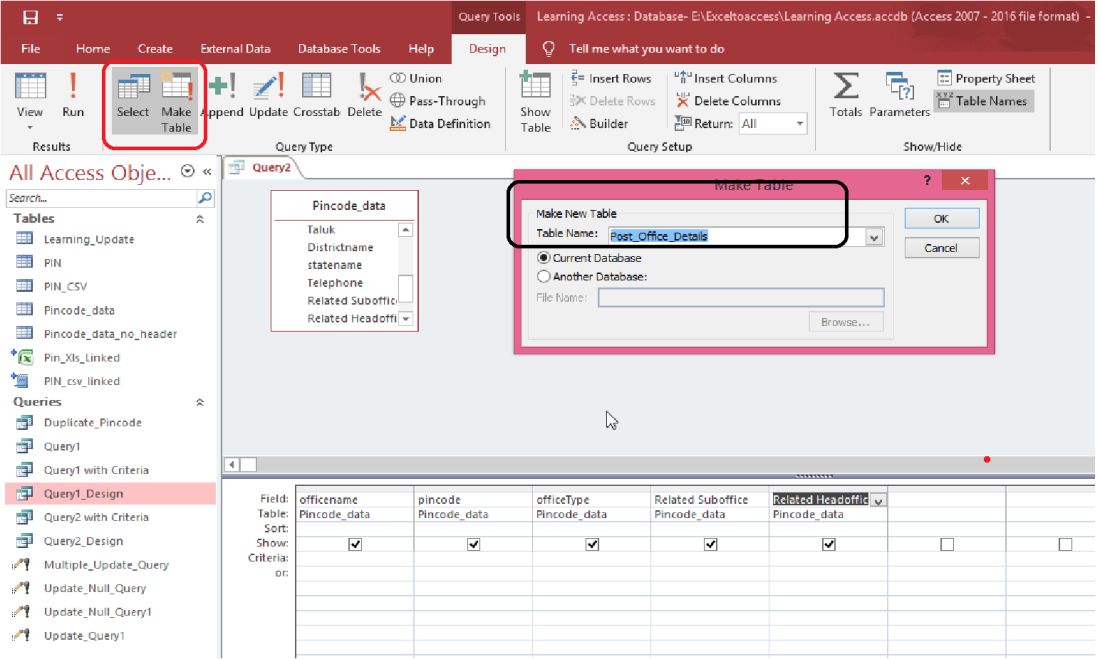
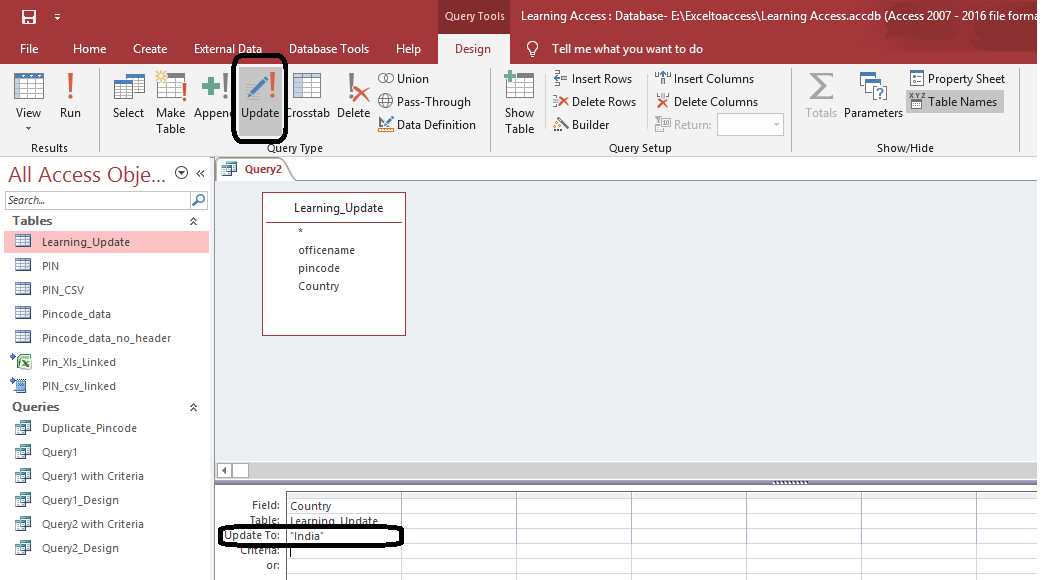
  • Select the column TAT_SLA  (twice) from the shipment Data Table in the bottom grid, Type the text “[SLA_TAT_Master].[SLA_TAT]” in the update to Row in the bottom grid to get the value from the master table. Note – The syntax to update values from other Tables is [Tablename].[Column name] i.e [SLA_TAT_Master].[SLA_TAT].
  • Set the criteria row of the second “TAT_SLA” column to Null. The Null criteria ensures that only those records are updated which have not been updated, else the query will update all the records in the shipment data table which have been updated previously.
  • Save the Query with the name “Update_SLA_Query“.
  • Run the Query “Update_SLA_Query” to update the records either by double clicking the query or by pressing the Entering key on selecting the key.
  • Open the Shipment Data Table to view the update in the TAT_SLA column.


Pasted below is the link of the URL of the You tube Video that will help you understand the Select Query.

Select Query Video

Pasted below is the link of the URL of the You tube Video that will help you understand the update Query for updating the SLA in the shipment data table.

Update Query SLA

Your Suggestions/Feedback are Welcome.


Blog # 24: Understanding and Working with Multple Tables.

Till now, we have been learning to work on a single table, i.e to add (Select), update and delete records of an underlying table with or without a given criteria (I.e based on Filter criteria required by the user).

But, many times, we find that the records (data) is on multiple sheets in an excel/spreadsheet and we need to map these records to get the desired output. Normally, we use Vlookup function to map and update the underlying spreadsheet to get the desired output data.

But what if we can use records data from multiple sheets (files) to relate data/records from multiple sheets/files to get the desired output. Yes, this is very much possible using any RDBMS (Relational Database Management Systems). To get the desired output, we need to set the relation between the two tables that have a common field and the data is to be unique in one of the tables.

Lets understand the process of setting relationship between two tables. (Note Relationship can be set up on more than one table that have common fields).

Let’s consider the tables “Pincode_Data” and “Post_Office_Table” created in the previous blogs.

Now suppose we want to generate a data that has the following columns “Officename”, “Pincode”, “Related Headoffice” and the “Circlename”. It is noticed that in the table “Post_Office_Table” we do not have the Circle name/State name associated with the respective pin code.

The obvious way that one could of think getting this output would be by modifying the table “Post_Office_Table” to include a new column named “Circlename” and updating the circle name for every Pincode from the base table “Pincode_Data“.

But then this methods has the following drawbacks:

  1. It defies the principle of “Data Normalisation” thereby increasing data redundancy.
  2. Any errors/Data corrections in the base table “Pincode_Data” would not automatically update the relevant records in the “Post_Office_Table“, there by leading to confusion and errors.

For Eg – say if the pin code “401103” which is currently  in the state of “Maharashtra” and is proposed to be moved to the state of Gujarat”, then the report generated using the above method will not reflect the correct state when the said pin code moves to the state of Gujarat unless the same is corrected in the “Post_Office_Table” too.

Is there a way out to overcome such problems and generate error free (updated) reports/data set?

Yes, the solution to such problems is to generate reports/data sets by joining two (two or more tables) and generate reports/data sets.

Lets go about understanding the same.

  • Open the “Learning Access” database.
  • Lets create a Select query using the “Query Design” option/method.
  • Add the tables “Pincode_Data” & “Post_Office_Table” to the upper grid of the design mode.
  • Identify a column (s) which is common to both the above two tables, which in our case happens to be the columns, “Officename” and  “pincode” (you Can choose as many columns as you want, at time if there is only one column which is common among the tables, the relation is set between the tables using this single column, though the output might differ at times).
  • Select the pin code column from the “Post_Office_Table” and drag it to drop it on the pin code column of  the table “Pincode_Data“. once dropped, a straight line is seen between the two tables on the column pin code, indicating that the two tables are related using the common column Pin code.
  • Repeat the above process of relating the two tables for the column “Officename“.
  • As a principle the relationship is to be set from the column(s) of the child table to the respective column of the parent table. ( Refer to the Blog Data Normalisation to understand Master Table (Also known as parent Table) and child Table concepts).
  • Drag and drop (select) the columns that are required as part of the data set/report.
  • Save the new Query having query name “First Relational Select Query Statename”.
  • Run the Query to get the desired data set(Records) or report.

Note –

  1. The Data Types of the common column should be the same (Identical).
  2. More the number of columns related, better would be the output datasets (Records).
  3. Change the Statename for the above mentioned pin code in the “Pincode_Data” and see the results for your self.

Pasted below is the Video link demonstrating the above process.

First Relational Query Statename

Blog# 23 : Understanding Delete Query

Here in this blog post, lets understand the “Delete Query“. Delete Query is used to delete a record or set of records (for a given Criteria) or entire records from the underlying table.

Let’s consider the table “Post_Office_Table” which we created using the Make Table Query in the previous Blog to understand the delete Query, the table has 154797 records and that we want to delete the entire records from the table.

The following process needs to be followed the entire records from the table:

  • Open MS Access and open the database Learning Access.
  • Create a new Query using the Design Mode.
  • Add the table “Post_Office_Table” to the right pane of the query design area.
  • Add all the columns to the right bottom grid of the Query pane.
  • Change the Query type to “Delete“.
  • Save the Query with the name “Delete_Query1“.
  • Click on “Run” to execute the Query.
  • Click in “Yes” to Confirm execution of the Query.
  • The Query is executed and all the records in the underlying table are deleted.
  • Open the Table “Post_Office_Table” to see the results. The records would have been deleted.

Pasted below is the Video demonstrating the same.

Delete Query1 Video

Delete Query2

Note – As an exercise, modify the query to delete records that has a value “NA” in the column “Related Suboffice” in the table “Post_Office_Table“. Delete Query2 Video demonstrates two methods to pass the criteria for deleting records that match the criteria “NA“.

Query with Criteria 

Dynamic Query to pass criteria at Run Time


Blog#22 : Creating a Table using a Query

Till now we have learnt queries to either view records (using Select Query) or update a record (s) (using Update Query) for an underlying table.

But what if we want a part of the record (s) of an underlying table i.e all columns or some columns in full or for a given criteria, in a new table which needs to be further worked for data analysis.

Here in this blog we will learn to create a table using “Make Table Query option.

Let’s use our table “Pincode_Data” to understand the same. Let’s say we want to create a table named “Post_Office_Details” having the columns “officename“, “pincode“, “officetype“, “Related Suboffice” and “Related Headoffice” from the “Pincode_Data” table.

One method that would obviously come to our mind is create a select query with the required columns, copy the output from the executed query and paste the same in an excel sheet and import the same in an access table.

Here we learn to create the “Post_Office_Details” table using the “Make Table QueryOption.

Following is the process to create the same.

  • Open the database “Learning Access.
  • Click on “Create” in the Menu Bar and click on the “Query Design” option.
  • Select the “Pincode_Data” table from the table menu and click on “Add“.
  • Select the columns “officename“, “pincode“, “officetype“, “Related Suboffice” and “Related Headoffice” so as to list the same in the bottom grid of the query.
  • Select the “Make Table QueryOption (This option is helps in creating a new table).
  • A new dialogue box prompts up, enter the name of the table to be created which in our case is “Post_Office_Details” as shown below.
  • Post_office_Details.png
  • Click on “OK” (This helps the query in naming the required table named “Post_office_Table“.
  • Click on “Save” and name the query as “Make_Table_Query1” (This saves the Query) and click on “OK“.
  • Click on “Run” to execute the Query, Click on “Yes” for execution.
  • Once executed, you can see the table “Post_office_Table” created under the tables option on the left pane of the window.
  • Open the table “Post_office_Table” to view records.

Note – The query can be executed as mentioned above or as shown in the Video, once the Query is saved. The make Table can be named as “Post_Office_Table” or “Post_Office_Details”.

Try running the query using various criteria (Select Query Using Criteria)

Pasted below is the video demonstrating the same.

Make Table Query1 Video

Blog#21 : Update record for a given Criteria (Update Query Continued)

In the previous blog we learnt about the “Null” Special marker, which is used to delete a text record. Here, in this blog we will learn to update the record of a given column or multiple columns in an underlying table for a given set of criteria or condition.

To understand the same lets refer to our table “Pincode_Data“. If we scrutinize the data in the columns “Taluk” and “Districtname“, we notice that some rows have the value “NA” in the Taluk Column and “Null” in the Districtname column (Note – The value “Null” is a text value in the record and not the Null special Marker.

We would like to update all the “NA” and “Null” Values in the respective columns with appropriate values, which we will learn how to update in my later blogs when we start learning working with multiple Tables.

Before we update with the appropriate values against the “NA” and “Null” text values, we would like to update the same with the “Null” Special marker which means there is no record against the records text “NA” and “Null“.

Following process is to be followed to update the “NA” and “Null” with the “Null” Special marker.

  • Open the database “Learning Access“.
  • Create a new Query using the “Query Design” Method and add the table “Pincode_Data” to the top right grid.
  • Add the Columns “Taluk” and “Districtname” to the bottom grid for which the values needs to be nullified using the “Null” Special Marker.
  • Change the Query type to “Update”. (By default the “Select” option is selected).
  • Type the text “Null” in the row named “Update To” (without Inverted Quotes) to nullify the values in the respective columns.
  • Set the criteria as “NA” under the column “Taluk” and “Null” (with Quotes) under the column “Districtname“. (Note if the Criteria is not set, then all the records in the respective columns will be deleted or nullified).
  • Click on “Run” to execute the Query.
  • Click on “Yes” to confirm execution (Try clicking on the “No” to see the result).
  • Save the Query named as “Update_Null_Query1.
  • Open the Table “Pincode_data” to view the results (You need to note some of the records before executing this query to view the updated results).

Hint – Refer rows having pin code “509133” before and after executing the query.

Note – Only those records are updated which have “NA” as record value in the “Taluk” Column and “Null” in the column “Districtname“. If the value is different in either of the column, the record is not updated to nullify the value. In case you want to update the same to delete or nullify the same without having met the criteria of both columns, then the columns needs to be updated using two different queries with respective criteria of the respective column.

Pasted below is the Video link of the Update Null Query1.

Update_null_Query1


Blog#20 : Understanding and Working with “Null” Special Marker.

In the previous blog, we learnt how to update the Value of a column of a Table. What ,if the updated valued is incorrect and that we want to rollback the updated value i.e delete the Value or nullify or say make it blank.

All RDBMS have a special marker named “Null” and this value is used in an update query to nullify the value in the underlying table. This “Null” is used on the columns have date type as text (Short Text , Long Text etc etc). When a column is updated using the “Null” marker the values is the respective column is deleted/erased and not updated to the text “Null“.

Lets understand the same by nullifying the value in the “Operational” column of the table “Learning_Update“.

  • Open the database “Learning Access“.
  • Create a new Query using the “Query Design” Method and add the column “Operational” in the bottom grid to update the values of this column.
  • Type the text “Null” in the row named “Update To“.
  • Click on “Run” to execute the Query.
  • Click on “Yes” to confirm execution (Try clicking on the “No” to see the result).
  • Save the Query named as “Update_Null_Query“.
  • Open the Table “Learning_Update” to view the results. You will notice that the values in the column “Operational” is deleted.

Note – Multiple columns of a table can be updated with “Null” Value. Once updated to Null there is no Undo Option to reverse it. You need to run an update query to restore the original Value or create a new query to update the column with appropriate Value(s).

Pasted below is the Video link of the Update Null Query.

Update Null Query


Blog#19 : Understanding Update Query Continued…

In the previous blog we learnt how to update a new column using an “Update” Query.

Now what if we want to update two or more Columns in the underlying table that are independent of each other i.e values in the columns being updated are not dependent of each other.

Lets use our table “Learning_Update” to understand the same. Suppose we also want to capture the continent having value as “Asia” and the Operational Status as “Yes” or “No“.

  • Open the database “Learning Access“.
  • Modify the “Learning_Update” to add two more columns having names as “Continent” and “Operational” both having data type as “Short Text”.
  • Create a new Query using the “Query Design” method and add the above mentioned columns in the bottom grid to update their Values.
  • Set the Values as “Asia” under the column named “Continent” and the Value “Yes” for the column named “Operational” against the row name “Update To“.
  • Click on “Run” to execute the Query.
  • Click on the option “Yes” to confirm execution of the query.
  • Save the Query as “Multiple_Column_Update“.

Open the table “Learning_Update” to view the updated table.

Note – If the “Update To” Value of the Continent in the “Multiple_Update_Query” is changed from “Asia” to “South Asia“, the values in the underlying table “Learning_Update” will be updated i.e the previous value “Asia” will be over written with the new value “South Asia”.

Try updating the Operational Column value to “No“. Both these

Pasted below is the Video Link for the Same.

Multiple Columns Update Query


Blog#18 : Understanding Update Query (Basic)

Till now, we have been learning how to view (without being allowed to modify) records from an underlying table.But what if we want to modify or add data (in a new column) to a record or set of records in a table.

Access allows us to do the same using an “Update” query. Before we move on understand “Update” Query, it must me noted that the records can me modified which are stored as tables in Access and not on tables that are  linked with a text or an Excel file (refer my blog Blog#12 : Creation of Table by linking a spreadsheet or text file. to understand the same).

In order to make it easy to I have created a new table named “Update_Learning” having two columns “Officename“and “Pincode” (data being the same as in the “Pincode_data” table) and I want add the country name “India” against all the pin codes (rather it should be said that we need to add the country name “India” for all the records) that are present in this table and here’s how we do it.

  • Open the table “Updated_Learning” in “Design View” to Modify Tables structure to add an additional column named “Country” having “Short Text” as data type.
  • Open the table “Learning_Update” to see new column being added and having no records/values in the country column.
  • Create a new Query using the Query Design method and select the table named “Update_Learning” to create an “Update Query” to add the “India” against every record (row) .
  • Change the query type to “Update” from the option under the menu bar as shown in the below image.
  • Since we only need to update the table with the country name “India” against the column name country , we  need to add the column named “Country” from the right upper pane to the first column in the lower right pane (Same process as used while creating select Query to view records) and the type the text India against the row heading “Update To” in the lower pane of the Query as shown below.
  • Click on “Run“.
  • A confirmation dialogue box  with Yes and No buttons would appear stating the count of records that are being updated, Click on Yes to Execute the Query to execute the query which will update the underlying table “Learning_update” with the Text “India” against every row/record in the country column.
  • Save the query by naming it as “Update_Query1“.

upd_Basic

  • Open the table “Learning_Update” to see the records with updated values in the country column.

Exercise – Try updating the column country with the country name as “USA” or a country name of your Choice. You can also try adding new or additional columns of your choice and update the records in the new/additional column (Hint – Add a new Column to capture the Continent of the Country.

Note – A particular record/data can be updated as many times as you wish. it also means that the new data overwrites the old data.

In case multiple columns needs to be updated, the relevant columns needs to be added in the lower pane grid to update records.

Pasted below is the Video link for basic update Query (Update_Query1).

Basic Update Query


Blog#17 : Understanding and Working Query in Design Mode.

Till now we have learnt to design or make a query using the Microsoft Access Wizard Option, which is quick and easy.

Here , I would attempt to explain the second method to make a query using the “Query Design” method/option. This method is very useful while creating a query either on a single table or on tables (two or more) that are related or can be related using a common field. This option is also very useful and effective when making query to either delete or update records in a table for all records or specific record(s) for a given condition or criteria.

Once used to this method of creating a query, this will be most used option to create a query in Access.

The types of queries that can be created using the design method are as mentioned below and these are the commonly used types of queries while working in access or any RDBMS.

  • Creating a  “Select” Query (Select Query is used for viewing records in a table).
  • Creating an “Update” Query (Update Query is used to modify all records in a given table or specific records for a given condition/criteria/parameter.
  • Creating a “Delete” Query (Delete Query is used to delete all records in a table or specific records for a given condition/criteria/parameter).

Let’s learn how to access the “Query Design” option to create an Query for viewing records of “Pincode_data” table.

  • Open the “Learning Access” database.
  • Click on “Create” option in the Menu (Top) bar. Query_Design_Img.png
  • Click on “Query Design” as shown in above image, a new dialogue box opens up named as “Show Table“.
  • The dialogue box show table has 3 tabs namely “Tables” (lists all the saved/created tables in this database) ,”Queries“( lists all the created and saved queries that have been created in this database), “Both” (lists both the Tables and queries that have been created and saved).
  • Select the “Pincode_Data” table from the list and click on “Add” (alternatively, the “Pincode_Data” table can be double clicked).
  • Click on “Close” to close the “Show Table” dialogue box.
  • The image below shows the layout of the Query in “Design Mode“. The query type is “Select” as highlighted under the menu bar. It also displays the columns of the table “Pincode_Data” which needs to be selected (either all or selective columns) for viewing the records from the underlying table.
  • The columns required in the query needs to be selected from the list either by double clicking or dragging and dropping in the row named “Fields” (Red Box).Query.png
  • Once the required columns are selected, click on “Run” or “View” (to the left of the “Select” to run the query.
  • Click on “Save” Icon or use the”Save” option under the file menu to save the created query. Let’s name this query as “Query1_Design“.
  • Once Saved, the “Query1_Design” query will be listed under the option “Queries” on the left pane.
  • In case all the columns of the table are required, you need to select all the columns by double clicking on the table name “Pincode_Data” in the design view  in the list displayed in the right pane.

Note –

  1. The created Query can be opened in “Design View” by selecting – right click and “Design View”option. The saved query can be modified n number of times (either to add, remove columns from the query) to view data with required columns from the underlying table.
  2. The same query can also be used to view records from the underlying table for a given criteria/parameter. (Refer the previous blog to understand the same, the link for which is available here) Blog#14 : Creating a simple query for a given or required Criteria/Value.
  3. The Video link available below demonstrates the various options to select required columns or all columns as per the needs and saves multiple select queries with unique name.

Pasted below is the link of the You tube Video to understand this blog.

Creating Query using Query Design Option

Blog#13 : Understanding and creating a simple Query.

Blog#16 : Finding Duplicate Records in a data Table

In this post we learn to find duplicate records (if any) exists in a given table. Normally in an Excel or any spread sheet, we use the “Countif” function to find duplicate records or use the pivot table to find the same. But this can be cumbersome, if the count of records are large in numbers.

This task is simplified in MS access by using the “Find Duplicates Query Wizard” query.

We will use the same table “Pincode_Data” to learn how to use a query to find duplicate records.

Following are the Steps:

  • Open the database “Learning Access“ and open the “Query Wizard“.
  • Select the Option “Find Duplicates Query Wizard“.
  • Select the “Pincodes_Data” Table in the next dialogue box of the Wizard.
  • Select the Columns for which duplicate records are to be found. Here we select the columns “officename” and “Pincode” columns and click on “Next“.
  • The next dialogue box of the wizard offers option to select any additional columns if required. Here, we wouldn’t select any columns and
  • click on “Next“.
  • Complete the wizard by naming the query appropriately, we name the query as “Duplicate_Pincode” complete the wizard by clicking on the “Finish“.
  • The results of the query are displayed as shown below.Dup_Pincodes

The output shows the details of records (8 Records) that are duplicate in the Pincode_data table and the count of duplicate records for every duplicate row. In Summary it states that the value “Boraj B.O” having pin code “847105” is duplicate and repeated twice in the “pincode_data” table.

Lets understand how the results have been arrived. Here the duplicates query searches for duplicate records for both the columns “Officename” and “Pincode“. The query finds that there are 2 similar records (i.e same Office name and same pin code) for the above shown column names and the output is displayed along with the count of duplicate records as shown above.

Even if the data in one of the columns is not matching, the query would consider them as unique or different records and will not be considered as “Duplicate Record“.

Open the table “Pincode_Data” and Search the table for the value “A.Pudupatti B.O” in the column named “Officename” using the “Text Filter” option  on the Table “Pincode_Data“. You will see that though the office name is same the pin codes differ and hence the said record is not counted as duplicate record.

You can get an hold on this query by creating additional queries and analyzing the results.

The above value can also be viewed by using a simple query.

Pasted below is the video link to understand the same.

Query for Duplicate Records