Blog#15 : Creating a simple Query to pass the criteria at Run Time/Dynamically

Now that we have learned to create a simple query on a single table using the query Wizard and also learned to get an output for a given criteria. But then we had to enter the required parameter/query at the time of the creation of the query in the “Design Mode“.

But what if you want to enter/pass the criteria on the fly or say dynamically? It would be very cumbersome to enter the criteria every time. It could also pose a risk to enter the same in the design Mode as the query could get changed in case the user is not conversant with MS Access.

This problem could be overcome by using the feature given by MS Access so as to enable the user the enter the criteria/parameter on the fly or at the time the query is executed to run (before the output is displayed).

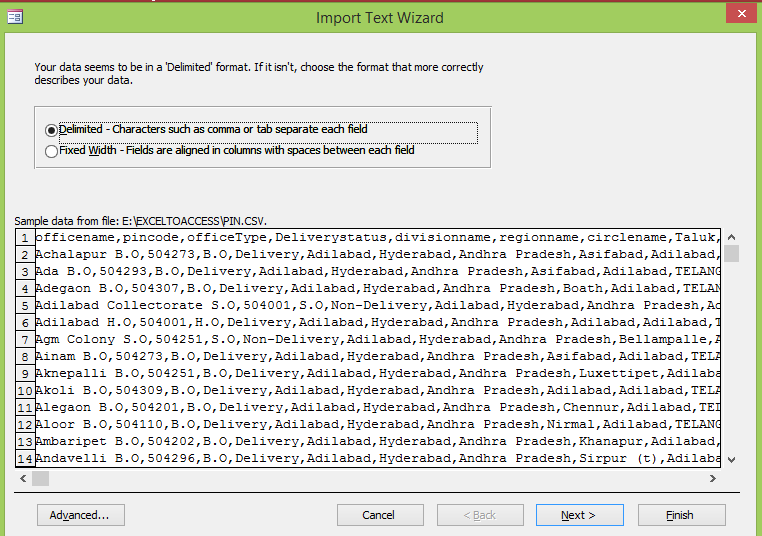
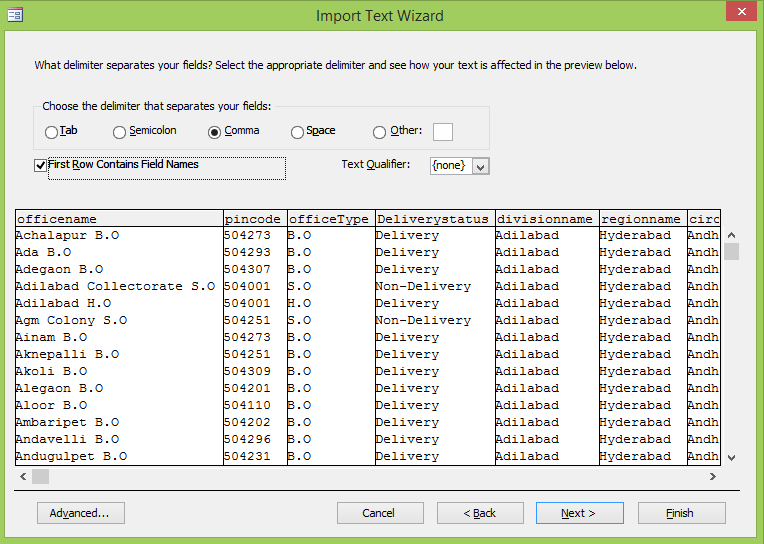
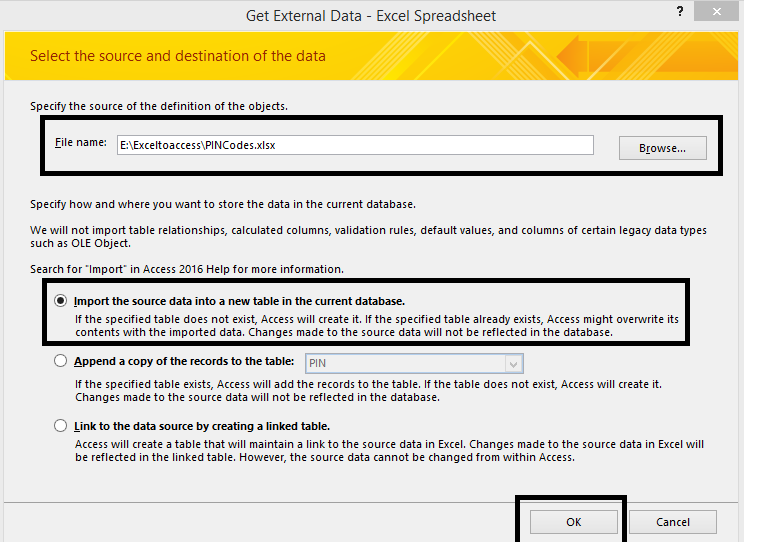
Let’s understand how do we use the same and we will use the same pin code data table to understand the same.

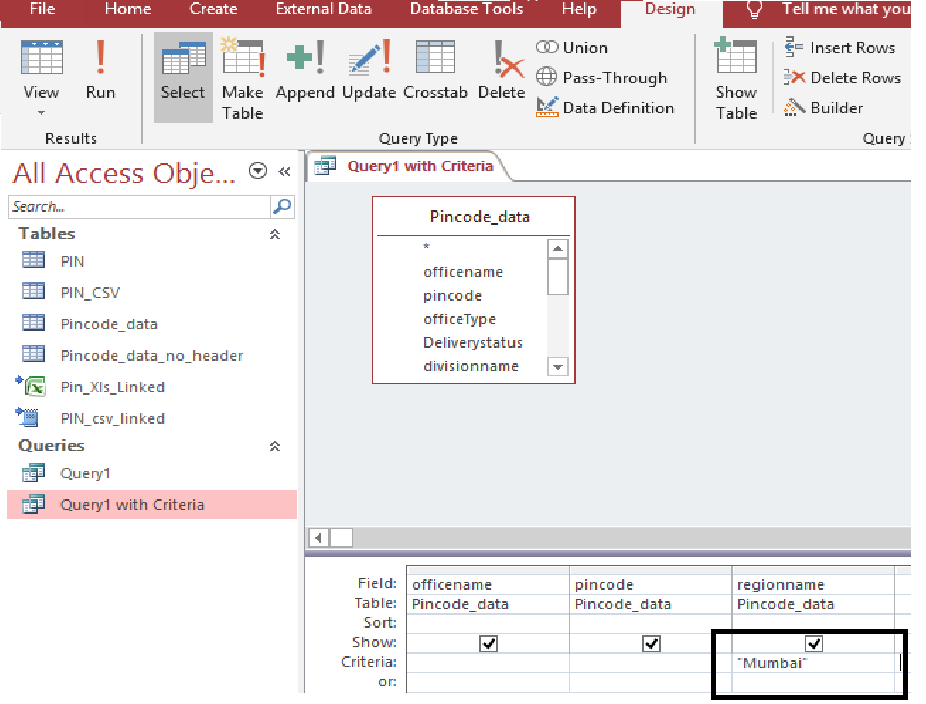
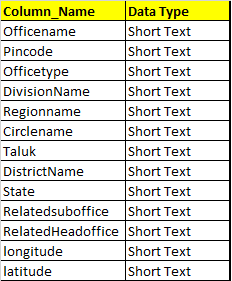
Let’s say we are creating a query having the columns “officename“, “Pincode“, “regionname” based on the table “Pincode_data

The steps to be followed for creating the query is as same in the previous blog (till you open the query in the “Design Mode“), hence i will not repeat the same here and you need to refer to the same using the link below…

Blog#14 : Creating a simple query for a given or required Criteria/Value

The Query is to named and saved as “Query2 with Criteria

Once the query is in the design mode, you need to enter the text [Enter Region Name] in the row named “Criteria” below the column name “regionname“.

The text [Enter Region Name] pops as a dialogue box prompting the user to enter a Value which is then passed on the query that is being executed which it uses to give the desired output.

Image of the query in Design Mode.

Query2_with_cri_input

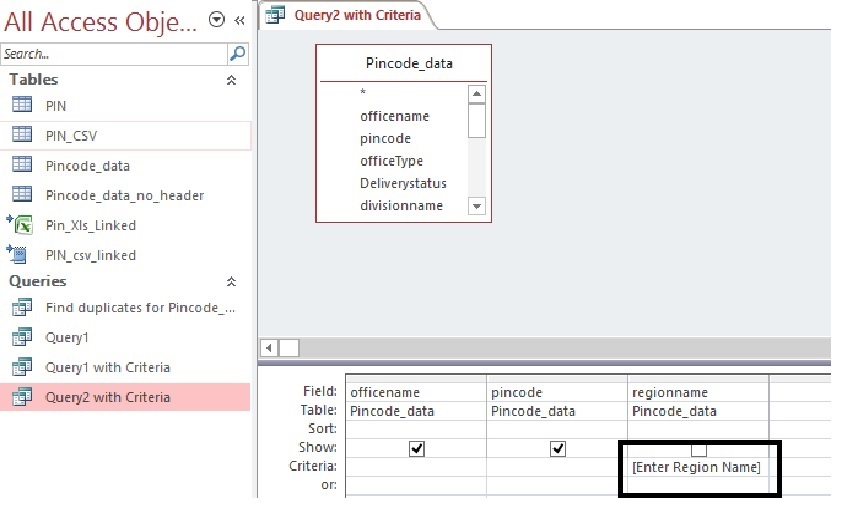
Image of the Input Dialogue Box that appears when the query is Run/Executed.

input_box

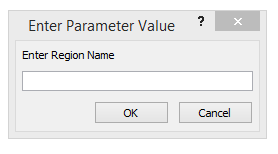
You can enter the relevant Value that is to be passed on to the Query for execution. Examples of Values like “Mumbai“, “Delhi” etc etc ….

Based on the Input Value the Query will be return the output data… in case there is no data in the table based on the value passed using the above dialogue box, the query will not return any data.

Pasted below is the link of the Video demonstrating the same.

https://youtu.be/yHA-_rzwCSM

Useful Tip – Instead of creating a new query using the query Wizard, a new query can be created using  Copy and Paste option, try creating “Query2 with Criteria” using this method, Copy the query named “Query1 with Criteria” using the Ctrl+ C option and pasted using the Ctrl + V option with query name as “Query2 with Criteria“. The remaining process remains the same.

Blog#14 : Creating a simple query for a given or required Criteria/Value


In the previous blog we learned to create a simple query using the Query  Wizard, where in we created a simple query to list all records from the Pincode_Data table for only two columns/ fields of our choice.

Here in this blog we will try to learn a create query that lists records from the “Pincode_data” table for a given criteria, i.e to have a list of records for a given input.

We will use the sample example of the previous query to understand this point. In the Query that was created (Query1), we only requested to list all records from the “Pincode_ data” having columns/fields of our choice (we chose to list the field “Regionname” and “Pincode”). Now suppose we want the list of records with the above columns/fields but only for the  city “Mumbai” from the “regionname” field/column. How do we create a query that lists the fields “regionname” and “Pincode” pertaining to the city “Mumbai”. the city “Mumbai” is the criteria for filtering the data.

Following Steps are to followed to create an Query for the  above output.

  • Open the database “Learning Access“.
  • Select the table “Pincode_data” with a single click from the left Window (Do not Open the Table)
  • Click on “Create” using the Menu.
  • Click on “Query Wizard“.
  • Select “Simple Query Wizard” from the dialogue box and then click “OK“.
  • Select the fields/columns named “Officename“,”Pincode” and “regionname” and click on the “>” symbol. The selected column moves from the left to the right side of the list.
  • Once all the required columns/fields are selected and moved from the “Available Field” to “Selected Field“, click on “Next“.
  • The last section of the wizard help you name the Query (by default it suggests a Name), we will rename it to “Query1 with Criteria“.
  • Select the option “Modify the Query design” using the radio button and click on “Finish“.
  • The Query is opened in the design Mode for you to modify as shown below.query1_criteria.png
  • As shown above you can see three fields/column that have been selected.
  • You need to enter the Criteria “Mumbai” in the cell below the “Tick Mark i.e you need to Type “Mumbai” in the row named “Criteria” and under the column named “regionname” as we need to filter the records for “Mumbai” under the regionname column/field.
  • Save the Query using the Save option.
  • View the results of the Query using the “Run” Option under the Menu and the results are displayed.
  • The created query (Query1) cane been seen on the left pane under the heading queries.
  • The query would also show the column “regionname” in the output. In case you do not want the field/column “regionname” to be displayed in the output, simply untick the tick mark below the column name “regionname” at the time of creation of Query. This can be done by opening the Query in Design View as shown in the attached Video.
  • The saved query can also be viewed in “Design View” by right clicking the query and selecting the “Design View” Option.

Creating Simple Query using Access Wizard.

Blog#13 : Understanding and creating a simple Query.

Note – You can try creating queries with various required columns/fields with criteria as per your needs.

Pasted below is the link of the Video demonstrating the same.

https://youtu.be/wS0u7wEm-b0


Blog#13 : Understanding and creating a simple Query.

Now that we have learned to create tables using various methods, its time now to understand queries or querying a table to get the required information/trend/result (processed data) from the data set for meaningful analysis.

You need to understand this topic very thoroughly to effectively use access, which will help you generate meaningful trends/ reports for your analysis.
What is a Query?

A query is a request for data or information from a database table or combination of tables.

MS access lets you create queries by using their “Query Wizard” and or by “Query Design”.

The wizard helps in creating the query by guiding the user in an interactive way using various dialogue boxes, that are required for creating a n query.

Let me elaborate to help you understand Query/Querying a table with the help of our PIN code data table we used for creating table (s) using the Query Wizard.

Now lets say we want to know or have the list of all Post office’s and their respective pin codes. While working on this data in an Excel/spreadsheet, we would apply a filter on the Region name and select “Mumbai” to list out all the post office’s under that region, but the output would also have all the column that are present in the excel sheet, which is not a desired output. MS Access helps us to select or get an output of only those columns that are required and for a given criteria i.e the Name of Post Offices and the associated Pin Codes.

Following Steps are to followed to create an Query for the  above output.

  • Open the database “Learning Access“.
  • Select the table “Pincode_data” with a single click from the left Window (Do not Open the Table)
  • Click on “Create” using the Menu.
  • Click on “Query Wizard“.
  • Select “Simple Query Wizard” from the dialogue box and then click “OK“.
  • The next dialogue box lists the columns/Fields that are available for selection from the “Pincode_data” table. The left pane is named as “Available Fields” and the right pane is named as “Selected Fields
  • Select the first column named “Officename” and click on the “>” symbol. The selected column moves from the left to the right side of the list.
  • Select and move the column named “Pincode” to the right side of the pane in the dialogue box.
  • Once all the required columns/fields are selected and moved from the “Available Field” to “Selected Field“, click on “Next“.
  • The last section of the wizard help you name the Query (by default it suggests a Name), we will rename it to “Query1” and continue with the selected radio button (Default) which states “Open the Query to view the information” and click on the “Finish” button to view the results.
  • The results are displayed having two Columns/Fields.
  • Save the Query using the Save option.
  • The created query (Query1) cane been seen on the left pane under the heading queries.

Pasted below is the link of the Video demonstrating the same.

https://youtu.be/Lkyfh4Uh0ys

Note – You can try creating more queries with fields/columns of your choice so as to master the concept.

The following method is used to run a saved query (any time later), select the query and click on “Run” from the Menu bar or “Double Click” the saved query or select the required query- right click and click “Open” from the popped up menu.

Blog#12 : Creation of Table by linking a spreadsheet or text file.

At times, we would not like to Import data in access to create tables/ rows using either of the options discussed in the previous blogs. Here, we discuss the option to create tables from an underlying excel spreadsheet by just linking it to create a table/records in MS Access.

Lets use the same “Pincodes.xls” spreadsheet to create table using this method.

Ensure the Excel file from which data is linked is not open.

The below mentioned steps are to be followed for creating table using data from an Excel sheet,

  • Open MS Access.
  • Open the database “Learning Access” that we created.
  • Click on “External Data” from the Menu Bar.
  • Click on New Data Source, a drop down appears and Select “From File” and then “Select the Excel Icon” from the drop down menu of “From File” if you want to link an Excel File and select the text “Text File” if you want to link a Text File (.csv or .txt format). Refer Previous blogs to understand various text file/csv files that can be used to create table in access)
  • Pasted below is the dialogue box that appears after clicking on the Excel/Text File as explained above.
  • Link_Table
  • Select the appropriate Excel or text file from the stored location (local drive) using the browse option.
  • Ensure the option (also known as radio button) “Link to the Data Source by creating a Linked Table ” as shown above is selected.
  • Click on “OK”. (Note the “OK” option is enabled only after file is selected).
  • Follow the steps mentioned in previous blogs for importing data from (Excel and Text file) to create a linked table.
  • Click on “Finish” once done, the Linked table is created.
  • The linked tables can be seen under the header “Tables” in the left pane of Access as shown below. The table “PIN_XLs-Linked” is created by linking an Excel File and the table “PIN_csv_linked” is created by linking the Text file.

(Note the icons of the table’s created).

Linked_Table_Image

The following points needs to taken note when creating tables by linking file.

You cannot edit or delete data in created tables, i.e any change in data that needs to be edited/deleted needs to be changed in the original file that is linked.

  • You wouldn’t be allowed to modify/alter the structure and data type of the tables created i.e you wouldn’t be allowed to add any new columns.
  • The data type of each column needs to be defined in the excel file/spreadsheet itself, before its being linked (By default the data types of all columns would be defined as “Short Text” when a table is created by linking the the file).

Now that we have learned the various methods of creating tables, I will also be posting methods or ways to add additional (new) rows/records in an existing table (also known as appending records/rows).

My next blog/posts would help to learn about “Queries/Query” a table(s).

Would love to hear from you on my posts. I would be glad to help you in case you have queries or doubts that needs clarification.

Happy Learning.


Blog#11 : Creation of Table/records from a Text File (CSV Format).

Here we will learn the method of creating table from an .CSV ot Text File that has values/data separated by comma for processing or for further analysis. We will use the same PIN.csv file to create table using this method. This method is also know as “Import Text Wizard“.

At any given point, we need to ensure that all naming rules related to tables and columns need to be adhered. Refer to my previous blog on the same Blog#6 : Understanding Tables and columns of access tables.

In case, the column names in the excel sheet do not follow the rules applied for RDBMS, access would automatically enforce the same while creating tables.

Ensure the Text file from which data is imported is not open.

The below mentioned steps are to be followed for creating table using data from an Excel sheet,

  • Open MS Access.
  • Open the database “Learning Access” that we created (Refer Previous blog on this) .
  • Alternatively you can create the file by creating a blank database and suitably naming the database.
  • Click on “External Data” from the Menu Bar.
  • Click on New Data Source, a drop down appears and Select “From File” and then “Text File” from the drop down menu of “From File“.
  • Pasted below is the dialogue box (Import Wizard) that appears after clicking on the Text File Icon as mentioned above.
  • Select the text file (I have name the data file as PIN.CSV) from the stored location using the browse option.
  • Ensure the option (also known as radio button) “Import the source data into a new table in the current database” is selected.
  • Click on “OK”. (Note the “OK” option is enabled only after the text (.CSV) file is selected).

Import Wizard Dialogue Box

Import_text_file

The Option “Delimited – Characters such as comma or tab separate each Field” is selected by default if the values in the csv or text files are separated by either comma or a Tab as shown below.

Delimited_wiz.png

  • AS the Values in the CSV files are separeted by a comma “,” (also known as delimiter) in the csv or text file, the radio button “Comma“, Check (Tick the box) that states “First Row Contains Field Names

TExt_wiz2.png

  • Click on “Next” in the Wizard dialogue box.
  • A dialogue box appears along with the columns that are being created, Select appropriate data type for each column (Change the data type of pincode column to Short Text).
  • Select the option “No Primary Key” Option and Click on “Next“.
  • The Next Dialogue prompts to name the name of the table. Name the Table appropriately as “Pin_CSV” and click on “Finish“.
  • Click on “Close” to end the Wizard of creating table.
  • The created Table “Pin_CSV” is visible on the left pane of the Access Window.
  • You can view the properties by clicking on the “Design View” after selecting the “Pin_CSV” table, the data in the “Pin_CSV” table can be viewed by opening the table using the open option.

Brief on Delimiters – As we know that data in a spreadsheet is stored in separate cells that help us identify as either columns or rows, which helps any RDBMS to separate the values in either rows or columns while importing data. But then how will RDBMS separate values as columns or rows when data in stored in a text file. All spreadsheets or RDBMS when exports data to be stored in a text file, the column values are separated either by a comma “,” or a “Tab Space” which is generated by pressing the Tab Key on the key board while generating manual text file or by a Semi Colon “;” or by a simple Space or by any other special character such as “|” or “\” (Character on the Key board above the Enter Key). This separator helps the RDBMS to identify the values of each column and helps to create appropriate columns while creating tables.

The mostly used or default methods of separator values used are “Tab”, “Semicolon”,”Comma” or “Space”. Hence, appropriate radio buttons (Options) are provided by Access to identify and separate columns.

In Case, the columns are separated are separated by any other character, the radio option “Other” is selected and the appropriate special character is typed in the provided text box (eg = “\” or “|”  or any other character).

End of Row in a text file is not identified by any character, i.e there is no character or identifier at the end of the record, which helps identify the RDBMS system to denote that there are no more columns ahead and the next line is a new row.

Trust, this post clears the concepts of importing a text file. You can read my previous blogs to understand RDBMS concepts, which will help your working with Access or any other RDBMS easier.

You can convert the attached .xls file in previous blogs as .CSV file by using the “Save As” option.

Pasted below is the video link demonstrating the process of importing data from a text file.

Importing Text Files

Blog#10 : Creation of Tables/Records using Copy Paste Option.

In the previous blog we understood the process of creating tables/records in MS Access from an excel sheet Using an “Import Spreadsheet Wizard“.

Here, we will look at an option to import data from an excel sheet to create table in MS access. We will use the same PINcodes.xls file to import data or create table in MS Access. This option is useful when we have to import a limited amount of data from a spreadsheet or say create tables that have limited amount of data.

Ensure the Excel file from which data is imported is not open.

Listed are the process to be followed;

  • Go to MS Access and open the Learning Access database.
  • Open PINCodes.xls file.
  • Select the Cells that have the relevant data that needs to be imported. In our case lets use data of only first two columns i.e A1:O500 of the sheet Pincode_data.
  • Copy the Selected Contents from cell A1 to O500 from the Pincode.xls file using “Ctlr+C” option or using “Copy” option from the menu bar.
  • Go to Access, Try to paste the contents of the clip board on the right pane of MS Access using the option “Ctrl+V” or “Paste” option from the Menu bar.
  • Access prompts the message “Does the First Row if your Data Contain Column Headings?
  • Click “Yes“, if the data Contain Columns names when copied from Excel or Click “No“, if the data copied does not contain column headers.
  • As in our case, the data has column names too, We need to click on “Yes“.
  • Access displays the message “All Objects were Imported Successfully“, once the table has been created with no errors.
  • Access automatically assigns table name for the table(s) created. The created table can be renamed by using the “Rename” option in the Popup Menu available by right click. The structure/properties of the created table can be viewed by opening the same in “Design View” (Refer Previous blogs to understand viewing the properties of table).
  • The Column names and Data Types can also be altered in the design view of the table. By default the data type of  column “pincode” is set as “Double” (Number Data Type) which can be changed to “Short Text” data type.

Trust this blog/post helps you in creating a single table or Multiple tables quickly which has limited amount of data.

Do share your Feedback or leave a comment if this post has been useful or for any improvements.

Blog#9 : Creation of Table/ Records using Data from an Excel Sheet (Import Spread Sheet Wizard)

In the previous blog we learned about creating a table using the default method and then modifying the table to accommodate the required columns and data types for every column. The data has to be inserted in the respective table manually (by typing in a similar way as is being punched in an excel sheet). Imagine typing/punching PIN code data which has around 0.15 million records (approx 1.54 lakh rows, refer excel sheet shared in the previous blog,  Blog#7 : Creation of Table(s) ).

Here we will learn the method of creating table from an excel sheet that has the required data for processing or for further analysis. We will use the same PIN code excel sheet to create table using this method. This method is also know as “Creating Table using an External File or Import Spreadsheet Wizard“.

At any given point, we need to ensure that all naming rules related to tables and columns need to be adhered. Refer to my previous blog on the same Blog#6 : Understanding Tables and columns of access tables.

In case, the column names in the excel sheet do not follow the rules applied for RDBMS, access would automatically enforce the same while creating tables.

Ensure the Excel file from which data is imported is not open.

The below mentioned steps are to be followed for creating table using data from an Excel sheet,

  • Open MS Access.
  • Open the database “Learning Access” that we created (Refer Previous blog on this) .
  • Alternatively you can create the file by creating a blank database and suitably naming the database.
  • Click on “External Data” from the Menu Bar.
  • Click on New Data Source, a drop down appears and Select “From File” and then “Select the Excel Icon” from the drop down menu of “From File“.
  • Pasted below is the dialogue box that appears after clicking on the Excel Icon as mentioned above.
  • Select the Excel file (I have name the data file as PINcodes.xls) from the stored location using the browse option.
  • Ensure the option (also known as radio button) “Import the source data into a new table in the current database” is selected.
  • Click on “OK”. (Note the “OK” option is enabled only after the Excel file is selected).Import_Excel
  • The “Import Spreadsheet Wizard” showing the various sheets that the excel file has, we need to select the sheet that has the data that we want to import, In this example the sheet named “Pincode_data” has the pin code data and that “Sheet2” has irrelevant data. Select the “Pincode_data” worksheet and click on “Next“.
  • The wizard opens the next dialogue box, which assumes or identifies the first row in the excel sheet as the column name (also known as header) of the data. It also displays a Check Box (Tick box) to be selected if the first row of the data is to be identified as the column name of the data. In our data, the first row is indeed the column of the data. Hence, you need to enable (tick mark) the check box mentioning “First row contains Column Heading” and then click on “Next“.
  • The wizard opens the next dialogue, which helps the user to rename the “Column name” and also define the “Data type” for every field that is imported, if the columns are to be kept the same as defined in excel sheet, you need not rename it, access also reads the data in respective columns and assigns the data type that is appropriate. it assumed the data type as “Short Text” for all values where is finds texts of alphabets. It assigns the data type as “Double” or “Integer” (Data type of Numbers) where ever it finds only numeric values. In case we want to change the system assigned data type, we need to select the requisite column and select the appropriate data type from the Data_type drop down.
  • In our case, the system assigns the data type “Double” to the Pincode column, as it finds that the values in the columns have only numbers, we need to change the  same to “Short Text” (as we do not need to perform any arithmetic operation on the pincode data) and click on “Next“.
  • The wizard opens the next dialogue box where it wants us to choose an option for creating primary Key for the data set. By default it selects the option where in it states “Let Access add Primary Key“. Here we do not need any primary key hence we choose the option “No Primary Key” and click on “Next“. (Refer previous blogs for understanding the concept of primary key, Blog#4 : Data Normalisation, Primary Key and Foreign Key).
  • The wizard opend the final dialogue box which helps us to name the table that is being created, by default, the worksheet name is assigned. In our case, as the sheet is named as “Pincode_data“, the same is proposed as the table name that is created. Since the name is appropriated, we do not change it and click on “Finish” to create the table using this “Import Spreadsheet Wizard“.
  • Click on “Close” without selecting any options.
  • The Table name “Pincode_Data” is created which is visible on the left pane of access.
  • The properties of the table can be viewed in the design view (refer previous blog to modify/view the properties of created tables Blog#8 : Adding Columns and setting properties of existing table (Modifying Tables).
  • Data in the table can be viewed by double clicking the “Pincode_Data” table or using the “Open” option from the right click menu/pop up menu.

Thus data is imported in access by using the import wizard, which was definitely better than the previous default method. This is the most frequently used method used by analysts for creating tables.

Going forward we will learn one more method for creating tables in access using the Copy paste function.

Note – if the check box (tick mark) is not enabled, access assumes that the first row in the data sheet is also a record and inserts the in the table as a data, it also assigns column name such as “Field1”, “Field2″…. for the columns, as column name cannot be blank.

Attached Video link shows the method of creating table using an external excel file.

Import Wizard Video

Attached Video link shows the method of creating table using an external excel file without header names.

Import Without Header Names


Blog#8 : Adding Columns and setting properties of existing table (Modifying Tables)

In the previous post we learned about creating a table named “PIN” in the database named “Learning Access” using the default method of creating table. The created table had only one column named “ID” and had a default data type “AutoNumber”.

Note – Auto Number data type creates automatic serial number for every new record/row that is inserted manually.

What do we mean by modifying a Table?

Modifying a table is nothing but to change the properties or structure of a table.

  • It helps to add or remove a column from an existing table, also known as modifying the structure of a table (similar to adding or removing columns from an excel sheet).
  • It also helps to change the properties of an existing table i.e change the data types of existing column (s) or renaming some of the column (s) or adding a validation rule.

Here, we will learn to modify the “PIN table to have the columns that are required for this exercise. Pasted below is the columns and the data type that is required for this table.

Columns required for the PIN Table

PIN_Code

Here is the list of process that is to be followed for modifying the tables.

  • Open the “Learning Access” access file that has been created.
  • We can see the “PIN” table on the left hand pane under the tab/header “Tables”. All tables created in this database “Learning Access” is listed under this header/Tab “Tables”.
  • Right click on the “PIN” table to open the quick menu/pop up and click on “Design View“.
  • The design view opens up the properties of the “PIN” table with three columns named as “Field Name“, “Data Type” and “Description (Optional)” in the upper part of sheet and “Field Properties” at the bottom part.
  • You can start typing the name of the columns from the second row and also set the required data type as per the above pasted table.
  • The moment you start adding the required columns and setting the data type as “Short Text” (if the default value is not “Short Text“, you can select the Short text from the drop down list).
  • The Field Properties  data sheet is shown in the below pane for that particular column (lets not change the properties as of now and let it have the default value and discuss that in future blogs) you can note some of the properties  that are listed.
  • Once all the columns with correct data types have created, i.e the table has been modified, “Save” the table by clicking on the “Save” icon or by clicking on the “Save“option under the File Menu. Saving is necessary to effect to the changes done.
  • If you try to close the modified “PIN” table without saving, access would prompt you to save the changes made. You can accept the changes by clicking on the “Yes” option.
  • The last column “Description (Optional)” is used to describe briefly the type of value that is stored in the respective column.
  • The structure of the table “PIN” should look like shown in the below image when viewed in design view.

Modify

  • Close the design view by clicking on the close button (upper right corner) just above the Description (Optional) text.
  • Once the design view is closed only the left hand pane with list of table(s), currently with “PIN” table is visible. Double click the PIN table to open the table in the right pane, start entering the data in respective columns (from the column name officename).
  • Use the attached Excel file “PIN_Codes with Lat_Long” to enter data in the created table. You may enter some of the rows in the  “PIN” table to get feel on the process of entering data in the table. Data is entered in the same way as data is entered in Excel. Xls File:  PIN_Codes_with_Lat_Long.


Would be glad to help you in case you are facing any difficulty in grasping the concepts or have difficulty in understanding any of the topics.

Blog#7 : Creation of Table(s)

In this post we will understand how tables are created in MS Access to capture or store records.

Here, we will creating a table for capturing/storing PIN codes and lat and long of all post offices in India. I have got the data from the government website stating the purpose of requirement as for “Teaching MS Access”.

Pasted below are the columns that are required for creating this table.

Note that all the columns have data types as “Short Text” and that none of columns have blank spaces in any of the column names. You are free to rename the column names to suit your needs for eg: you may want to rename the column “DivisionName” as “Divsion_Name” or “Div_Name”.

PIN_Code

Let us first create a table using the default method. Ensure the Excel file from which data is imported is not open.

Table Creation using default Method.

  1. Open “MS Access” by clicking on the MS access Icon.   (Refer Blog#5 to find MS Access on your Computer”.
  2. Click on “Blank dataBase”. This is the default option.
  3. Enter the File name as “Learning Access”. Pls ensure the database being created is stored in the appropriate path. I am using the path “E:\Exceltoaccess\”.
  4. A dialogue box appears and click on “OK”.
  5. Click on “Create” to save the database named “Learning Acess” stored under the path E”\Exceltoaccess.
  6. By default access a blank sheet is opened. Click on the “Save” Icon of use Save option under File Menu to save the blank table named as “PIN.
  7. The table has been created with a default Column name “ID” i.e it has only one column name Id and having data type as “AutoNumber”.
  8. In the next post we will learn to add columns to this “PIN” Table.
  9. Click on the below mentioned Video link to see the method of creating default table.  https://youtu.be/jAhMfZ7XJPY

Blog#6 : Understanding Tables and columns of access tables.

What do we mean by a table?

A Table is nothing but an Object in access to store data, You can relate to a table (s) with a separate sheet (One sheet each for Customer Records, Book Records and the transaction records) in an excel file.

Lets understand using the example of Library using my previous blog on Data Normalisation, Primary Key and Foreign Key.

Blog#4 : Data Normalisation, Primary Key and Foreign Key

In the process of normalisation we had segregated the data in the transaction data into the below mentioned tables.

  • Customer Master Table/Data – This is being used to capture or rather i would say create records of its subscribers (Customers). All data related to customers are stored here.
  • Master Book Table/Data – This is being used to create and record all the types of books that the library has for issuing to its subscribers.
  • Transaction Table/Data – This is being used to create and record all transaction of its books issued, received to and from its subscribers.

Note – Refer to various columns of each table mentioned in the normalisation blog against each table that helps to record or capture date in a given table.

Some Basic Concepts on Tables

  • Each Table has a name which helps us to identify, what data is stored in the respective table (akin to name of worksheet in an excel file).
  • Each Table has multiple columns which help us to record or capture relevant data in each column, eg customer ID, Customer Name etc of customer/Subscribers of the library. it may have additional columns which will help capture the contact details such as one column for Mobile Number, Email ID, address and PIN code (Zip Code). In short there is no limitation for creating columns. Let’s say the current librarian captures additional or alternate mobile/Email number of a subscriber in the same column named mobile number/Email, the same can be split by creating additional columns.
  • There are no restrictions on the number of records that can be stored/ captured in a table (Older versions of excel had limitation of 65000 rows).
  • Each column is named appropriately along with the data type of the column i.e whether the column stores data as text, number or date. Refer the previous blog on understanding data types Blog#3 : Understanding Data Types

Some important concepts on naming tables:

  • While naming tables the table name should clearly identify what data is captured or recorded in the table. For eg – if the table captures details of customers it should be named as Customer_table or Customer_Master or only Customers, if the table captures details of suppliers it could be named as Supplier_Master or Vendor_Master or simply Suppliers. if the data captures details of various bank accounts it could be named as Bank_Masters,Product_Master or Products if the table captures details of products.
  • The name should not begin with a space or end with a space i.e no blank space to be used either at the beginning or after the name of the table name, if the table is to be named as Bank Master, it should be separated with an underscore “_” i.e Bank_Master & not Bank Master (with Space in between Bank and Master).
  • Do not use any special characters such as “&” , “*” while naming tables.
  • Two tables in a database can have the same name i.e you cannot have two tables with the same name “Customers” or “Banks” or “Suppliers”. In case there is a need to create a new table to capture the similar data or same data it could be named as “Suppliers1” or “Customers_New” etc.

Some important concepts on naming Columns:

  • While naming tables the column name should clearly identify what data is captured or recorded and the data type in the table. For eg – if the table captures details of customer id or customer name it should be named as Customer_ID having data type as Short Text or Customer_Name having data type as Short Text or Long Text.
  • The name should not begin with a space, if the Column is to be named as Bank Name, it should be separated with an underscore “_” i.e Bank_Name & not Bank Name (with Space in between Bank and Name).
  • Do not use any special characters such as “&” , “*” while naming Column.
  • Two columns in a single table can have the same name i.e you cannot have two columns with the same name “Mobile” or “Email” or “Address”. In case there is a need to create a new column to capture the alternate Mobile, Email or Second line of address it could be named as “Mobile“, “Mobile1” or “Alternate_Mobile” having data type as Short Text. Please understand that the columns capturing mobile numbers or bank accounts numbers having only a numbers can be stored in the text data type as no numerical operations will be performed on the said data.

Trust you have understood the concepts, as these are the basic building blocks for working and most importantly overcoming errors that are displayed while working on access.

In the next post we would understand how tables are created.

Happy reading and learning.

Would be more than happy to receive your feedback for my blogs which would help me improvise the posts.